
As those of you in the HEMA cutting community know, the days we always complained about how expensive tatami is are over. Because, since the manufacturer stopped producing them, the days of paying a non-exorbitant fee to cut are over. (If you are reading in the future and this tatamipocalypse has resolved itself: hi.)
Of course just because there is no readily available supply of tatami mats doesn’t mean there are no ways to better your cutting mechanics. The number one best way to train has, and always will be, swinging your sword through the air. You will spend soooo much more time cutting empty space than you will on any target medium, and no matter what the available targets you need to be able to get the most out of it. But this isn’t an article about that.

This year for the SoCal Swordfight cutting tournaments RJ and I experimented with a different cutting medium: paper. Though there was probably enough tatami harbored in the SoCal doomsday bunker to get through a tournament, we both agreed that a hybrid tournament was the best way to go. Doing a tournament with both targets would allow us to use a traditional and well known target (tatami mats) as well as the new experimental target (paper). Learning everything we could in case we ever had to run a non-tatami event.
(When I say the tournament was an experiment it doesn’t mean we didn’t also experiment before the event started. But running through almost 2000 feet (600m) of paper cut at an event tends to crop up all sorts of things you’ve never thought of before.)
What And How
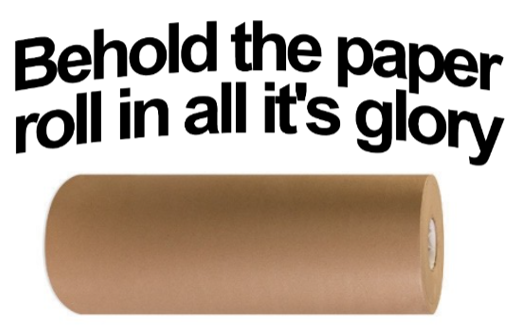
The target of choice was a roll of 75lb weight brown construction paper, 24” wide.Why 75 lb weight? Because that is the heaviest that everyone seems to carry. If we find even stiffer paper in the future we would probably use that.
You can find this paper on many online retailers, and a shipping company will be much cheaper than Amazon. Just make sure that you get the 75lbs paper, as there are many options to choose from. (And if you find even heavier stock let me know!)
Now that we have our awesome huge roll of paper, what do we do with it? The tool isn’t particularly interesting of its own accord.
The roll needs to be hung and the paper draped down. If you are fortunate enough to have tall ceilings the paper can probably hang the paper from a rafter. Here you can see the paper quickly lashed to one of the gear racks in the corner. In addition to the rope holding it up, there is a pipe through the center of the roll.

If you don’t have a good place to hang the paper then you need to build something free standing. Which was the case for the SoCal tournaments. We built two disassemblable paper holders, details of which are in the appendix at the end of this article.

One final note, you will have to do something to increase the friction of the paper roll on the pipe! The plastic fittings on the paper are very smooth, and once a roll is about half complete there is no longer enough friction to keep the whole thing from just spooling down endlessly. Wrapping the pipe in duct tape was sufficient to give it just a liiiiitle bit extra friction and keep the whole thing in place until the end of the roll.
Scoring Paper
Before the tournament we did some testing amongst ourselves to get an idea of how the medium handled. We came up with a list of faults and deductions, which can all be found in the rules (As with everything important in life, information can be found on HEMA Scorecard). The deductions we were looking to avoid:
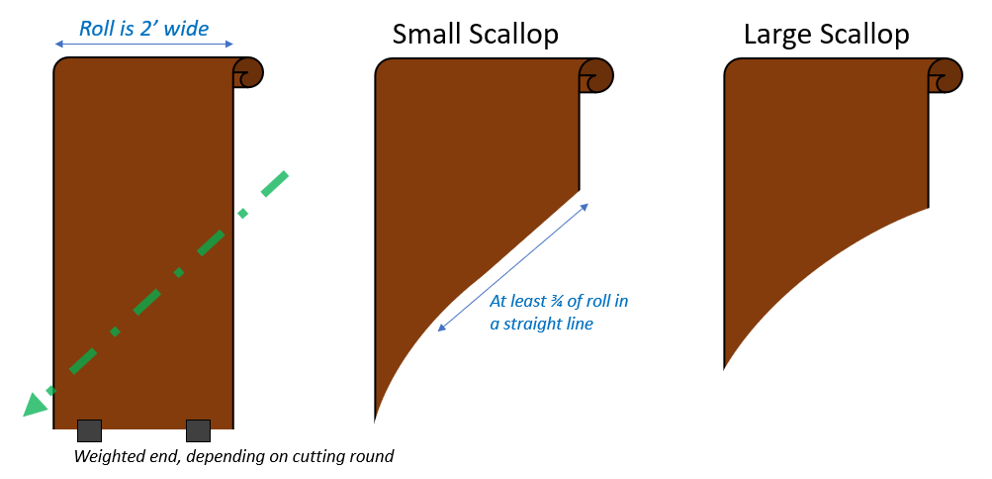

What we didn’t expect was just how slow it was to judge the cutting. Often the paper would curl on itself, making the exact angle and straightness of the cut impossible to observe. One of us would have to go up, pull the cut taut, and eyeball down the cutting line. Which added a lot of extra time. (Remember, in addition to the time to judge the cut itself you need safety buffers for the competitor to step away from the cutting area and back in.)
Prior to the competition we spent a good deal of time coming up with the list of deductions. And WOW, there are a lot of ways a paper cut can be weird that we never thought of. With such a wide cutting arc, and a flexible target, we say all sorts of weird curves and blips in the paper. When it was a clear cut case of “this was straight until it hooked sharpley”, the scoring was simple. But we got into many cases of “this is wobbling back and forth, but the overall line is straight”. How many wobbles is too many? Are a few sharp wobbles worse than a few long wobbles? Is a gentle curve worse than a straight line and then a sharp curve?
Quite frequently we had to conference and make a judgment call on the spot. While I don’t like this type of decision making on the tournament floor, we were at least able to make sure the same sort of performance deductions were applied consistently across all competitors. It’s a learning process and we did our best. And armed with this knowledge we can write tighter rules for next time.
Paper As A Training Tool
When using paper on your own for training you should keep an eye out for the following:
- Does the paper sway or make a sound when you cut it?
- Was the line mostly straight? Which direction did it curve?
With any hanging target ascending cuts are going to be much more difficult than descending cuts. We did some experiments with hanging weights on the bottom of the paper prior to the competition, but then decided against it. Doing unterhau on the paper gives some pretty good feedback, as you don’t have any tension to pull against.
If you really want to challenge yourself, cut paper with a blunt sword. You need a very clean line and a high swing velocity. The advanced cutters were able to do so, but only with difficulty. I think that this is probably an excellent way to up the difficulty. (The wider the edge of the blunt, the harder it is.)
The Final Verdict
Is paper a replacement for tatami? No. They both teach you different things. The paper is great for showing the ability to trace a line in space. It is not great for showing if you have sufficient energy in the blade, or structure to withstand feedback from the target. You can ‘cheat’ a lot on the paper, using very low energy cuts without proper arm extension or core engagement and not be punished.
If you are using this as a training tool it is important to “Give Er” like you are cutting something firm. This will show you your flaws in cutting when you are actually trying to generate power. If you optimize your form for cutting the paper you might end up with worse overall mechanics than when you started. (But have some really nice looking cuts on paper).
And because we all like charts:
| Pros | Cons | |
|---|---|---|
| Tatami | Gives resistance | Logistically a pain. Soaking, making a mess, and disposal all suck. Just one point in space along the cutting line. |
| Paper | Easy to prepare and clean. Doesn’t make a mess. Can see a long cutting line | A little work at first figuring out how to hang it. Doesn’t offer resistance. |
Appendix: Blueprints
This is how we constructed our stand, requiring very few cuts to be made. It doesn’t mean it is the only, or best, way.
Materials:
- 2 8′ 4×4
- 2 8′ 2×4
- 2 8′ 1×4
- 1 24” square of plywood
- 1 8′ pipe
- 10 5” carriage bolts and wing nuts (1/2″ or 5/8″ will work.)
The main difficulty is a design that keeps the posts well away from the cutting area. Our design moves the posts to the side, and behind the cutting plane. The other concern is taking this appart, as it is a monstrosity and impossible to transport otherwise.
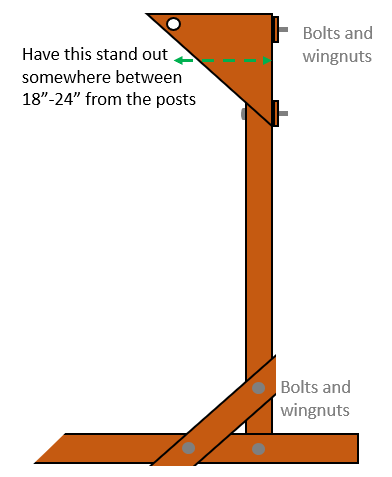
There are only three cuts involved. The first is to make a notch on the bottom of the 4×4 to fit the horizontal leg in. This allows the stand to be dis-assemblable using the bolts. If you didn’t care about taking it apart, and just wanted to use screws, there are other ways to do the legs.
The second is to cut the angled bracing piece that goes from the leg to the post. It should be about 2-3 feet long, and a 45 degree angle on both ends. The leg then becomes whatever is left out of the piece of lumber you cut it out of.
The last, and trickiest, cut is the gusset that will hold the pipe up. We used ¾” plywood and a 2’ square cut into triangles. If you don’t want to make it out of plywood because you don’t have scrap around (and don’t want to buy a whole sheet) there are also options to build something out of dimensional lumber, but you have to figure that out on your own.

As for the pipe, go to the hardware store and find something that looks like it will hold your roll of paper without bending.